Battery switch on travel trailer function is crucial for managing your RV’s power. Understanding how your battery switch works—whether it’s a simple single-pole or a more complex double-pole double-throw—is key to preventing electrical issues and ensuring a smooth camping experience. This guide will walk you through the different types of switches, their functions, troubleshooting tips, and best practices for wiring and maintenance.
We’ll cover everything from preventing corrosion to maximizing your battery life.
This guide breaks down the complexities of your travel trailer’s electrical system, focusing on the often-overlooked but essential battery switch. We’ll explore the various switch types, their respective advantages and disadvantages, and how they interact with other systems like your solar panels and converter. By the end, you’ll be confident in understanding and maintaining your battery switch, keeping your power running smoothly on the road.
Battery Switch Types in Travel Trailers
Choosing the right battery switch for your travel trailer is crucial for managing power and protecting your electrical system. Different types offer varying levels of control and safety features. Understanding these differences will help you select the best option for your needs.
Single-Pole Battery Switches
Single-pole switches are the simplest type. They provide a single on/off function, connecting or disconnecting a single battery to the trailer’s electrical system. This is suitable for trailers with only one battery. Wiring is straightforward: the battery’s positive (+) lead connects to one side of the switch, and the other side connects to the trailer’s positive bus bar.
The negative (-) lead typically connects directly to the chassis or a ground point. A single-pole switch offers ease of use and low cost but lacks the flexibility of more advanced options.
Double-Pole Battery Switches
Double-pole switches offer improved safety by controlling both the positive (+) and negative (-) leads of a single battery. This means both leads are switched simultaneously, minimizing the risk of accidental shorts or sparks. While still a simple on/off system, the added safety feature makes them a popular choice for many RVers. Wiring involves connecting both the positive and negative leads through the switch, providing a cleaner break in the circuit.
So, you’re prepping for your next adventure in your travel trailer? First things first: make sure you understand the battery switch on travel trailer function – it’s crucial for keeping your lights and appliances running. Once you’ve got that sorted, think about your entertainment. A killer audiophile travel aetup can seriously elevate your road trip experience, making those long drives way more enjoyable.
Check out that link for some sweet setup ideas!
Double-Pole Double-Throw (DPDT) Battery Switches
DPDT switches are the most versatile option, allowing you to switch between two batteries (like a house battery and a starting battery) or connect both to the trailer system simultaneously. This setup provides significant flexibility, allowing you to use one battery for essential functions while charging the other, or combining both for increased power. The wiring is more complex, requiring careful attention to detail to avoid short circuits.
They often have three positions: “Battery 1,” “Battery 2,” and “Both” or “Off”.
Comparison of Battery Switch Types
| Feature | Single-Pole | Double-Pole | Double-Pole Double-Throw (DPDT) |
|---|---|---|---|
| Number of Batteries Controlled | One | One | Two (or one, with both connected) |
| Safety | Lower (only controls positive lead) | Higher (controls both positive and negative leads) | High (controls both positive and negative leads for two batteries) |
| Complexity | Low | Medium | High |
| Cost | Low | Medium | High |
| Flexibility | Low | Medium | High |
| Wiring Diagram Complexity | Simple | Moderately complex | Complex |
Function and Purpose of the Battery Switch
The battery switch is a crucial component in your travel trailer’s electrical system, acting as a central control point for managing power flow from various sources. It’s more than just an on/off switch; it plays a vital role in protecting your equipment and ensuring efficient power management.The primary function of the battery switch is to isolate the trailer’s house batteries from the rest of the electrical system when not in use.
This prevents parasitic drain, a slow but steady discharge of the batteries even when the trailer is not actively using power. This drain is caused by small amounts of current drawn by things like clocks, carbon monoxide detectors, and even some RV refrigerators in standby mode. Leaving the batteries connected to these low-level drains can lead to a dead battery when you next need it.
Battery Switch Protection of Electrical Components, Battery switch on travel trailer function
The battery switch provides several layers of protection for your trailer’s electrical system. Firstly, disconnecting the batteries prevents accidental short circuits that could damage sensitive electronics or even start a fire. Secondly, it helps to safeguard the batteries themselves from over-discharge, extending their lifespan. Finally, it protects against potential backfeeding from external sources. For example, if your trailer is accidentally connected to shore power with the batteries connected and the generator running, the battery switch helps to prevent a dangerous surge or conflict between power sources.
Power Management from Multiple Sources
The battery switch is key to efficiently managing power from different sources – shore power (hookups at campgrounds), a generator, and your house batteries. When shore power is available, you’ll typically have the switch set to a position that allows power to flow directly from shore power to the trailer’s systems, bypassing the batteries. This allows you to run appliances directly from the campground power without using battery power.
If shore power is unavailable, you can switch to using your generator or your house batteries. Switching to the battery position allows you to power essential systems using the stored energy in your batteries. Many switches offer a third position that connects both the batteries and shore/generator power, allowing you to charge the batteries while simultaneously using power from the external source.
Power Flow Through the Battery Switch
This flowchart illustrates how power flows through the battery switch under different scenarios.[Imagine a flowchart here. It would show three distinct input sources (Shore Power, Generator, Batteries) each connected to a central Battery Switch. The switch would have three positions: “Off,” “Batteries,” and “Shore/Gen/Batteries.” Arrows would show the power flow path depending on the switch position.
For example, when the switch is in the “Batteries” position, an arrow would go from the “Batteries” input to the trailer’s electrical system. When the switch is in the “Shore/Gen/Batteries” position, arrows would show power flow from shore power and the generator to the electrical system, and also from the batteries (charging or supplementing power).]
Troubleshooting Common Battery Switch Issues
Dealing with a malfunctioning battery switch in your travel trailer can be frustrating, but understanding the common causes and troubleshooting steps can save you time and potential headaches. This section will guide you through identifying problems, fixing them, and preventing future issues.
Battery switch problems often stem from simple issues like corrosion, loose connections, or a failing switch itself. Sometimes, the problem isn’t even the switch but a faulty connection elsewhere in the system. Let’s explore how to systematically diagnose and resolve these problems.
Identifying Common Battery Switch Problems
Several issues can lead to a non-functional battery switch. Corrosion is a major culprit, particularly in humid or salty environments. The build-up of corrosion on the terminals and switch contacts can impede the flow of electricity, preventing the switch from working correctly. Loose connections, caused by vibration or improper installation, are another frequent problem. Finally, the switch itself might fail due to wear and tear or exposure to the elements.
A visual inspection is your first step to pinpoint the issue.
Troubleshooting a Non-Functional Battery Switch
A methodical approach is key to troubleshooting a battery switch that isn’t working. This involves a series of checks to isolate the problem.
- Visual Inspection: Start by carefully examining the switch and its connections. Look for signs of corrosion (green or white powdery substance) on the terminals and switch contacts. Check for any loose or damaged wires. A corroded switch might appear discolored or pitted.
- Check Connections: Tighten any loose connections you find. Use a wire brush or sandpaper to clean off any corrosion from the terminals and switch contacts. Make sure all connections are secure and free from debris. If the connections are heavily corroded, consider replacing the terminals.
- Test the Switch: With the connections clean and tight, try operating the switch. If it still doesn’t work, the switch itself might be faulty and require replacement. You can test the switch’s continuity with a multimeter (set to ohms) to confirm if it’s conducting electricity properly. A faulty switch will show high resistance or an open circuit.
- Check Battery Voltage: Ensure your batteries are charged and providing sufficient voltage. Use a multimeter to measure the voltage at the battery terminals and at the switch’s input and output terminals. A low voltage reading indicates a battery problem, not necessarily a switch issue.
- Inspect Wiring: Beyond the switch and terminals, trace the wiring connected to the switch. Look for any breaks, cuts, or damaged insulation in the wiring harness. Repair or replace any damaged wiring.
Preventing Common Battery Switch Problems
Regular maintenance and preventative measures can significantly extend the lifespan of your battery switch and prevent many common issues.
So, you’re getting ready for a camping trip with your travel trailer? First things first: learn how to properly use that battery switch! Check out this guide on the battery switch on travel trailer function to avoid any dead battery surprises. Once you’ve mastered that, think about your entertainment. For the serious music lover, setting up an audiophile travel aetup can really elevate your camping experience.
It’s all about enjoying the great outdoors in style and comfort, right?
- Apply Corrosion Inhibitor: Use a dielectric grease or corrosion inhibitor on the terminals and switch contacts to prevent corrosion. This creates a barrier against moisture and salt.
- Secure Connections: Ensure all connections are tight and secure. Use appropriate-sized connectors and tighten them properly to prevent loosening due to vibration.
- Protect from the Elements: If your battery switch is exposed to the elements, consider installing a protective cover or enclosure to shield it from moisture, dust, and dirt.
- Regular Cleaning: Periodically inspect and clean the battery switch and its connections. Remove any accumulated dirt, dust, or corrosion using a wire brush and a suitable cleaner.
Battery Switch Inspection and Maintenance Checklist
A regular inspection routine can help catch small problems before they escalate into major issues.
| Task | Frequency |
|---|---|
| Visual inspection for corrosion and loose connections | Monthly |
| Clean terminals and contacts with a wire brush | Every 3 months |
| Apply corrosion inhibitor | Every 6 months |
| Check switch operation | Every 6 months |
| Thorough inspection of wiring and connections | Annually |
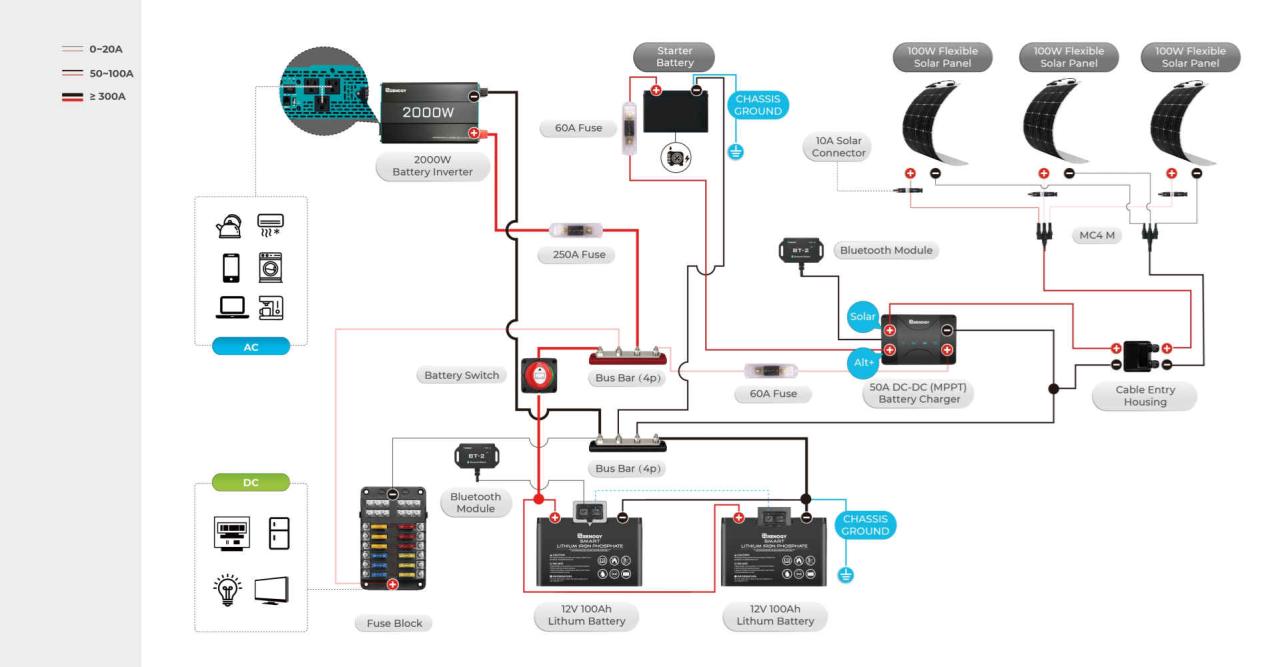
Wiring and Connections of the Battery Switch
Properly wiring your travel trailer’s battery switch is crucial for safe and reliable operation. Incorrect wiring can lead to electrical issues, damage to components, and even fire hazards. This section details the typical wiring configuration and emphasizes the importance of safe practices.
A typical travel trailer battery switch setup involves connecting the switch between the battery and the rest of the trailer’s 12-volt system. This allows you to easily disconnect the battery from the trailer’s electrical system, preventing accidental drain and protecting sensitive electronics. The switch itself is usually a simple on/off device, though some offer more sophisticated features.
Battery Switch Wiring Diagram
Understanding the wiring diagram is essential before beginning any work. Improper connections can lead to serious problems. Always disconnect the negative battery terminal before working on any electrical connections.
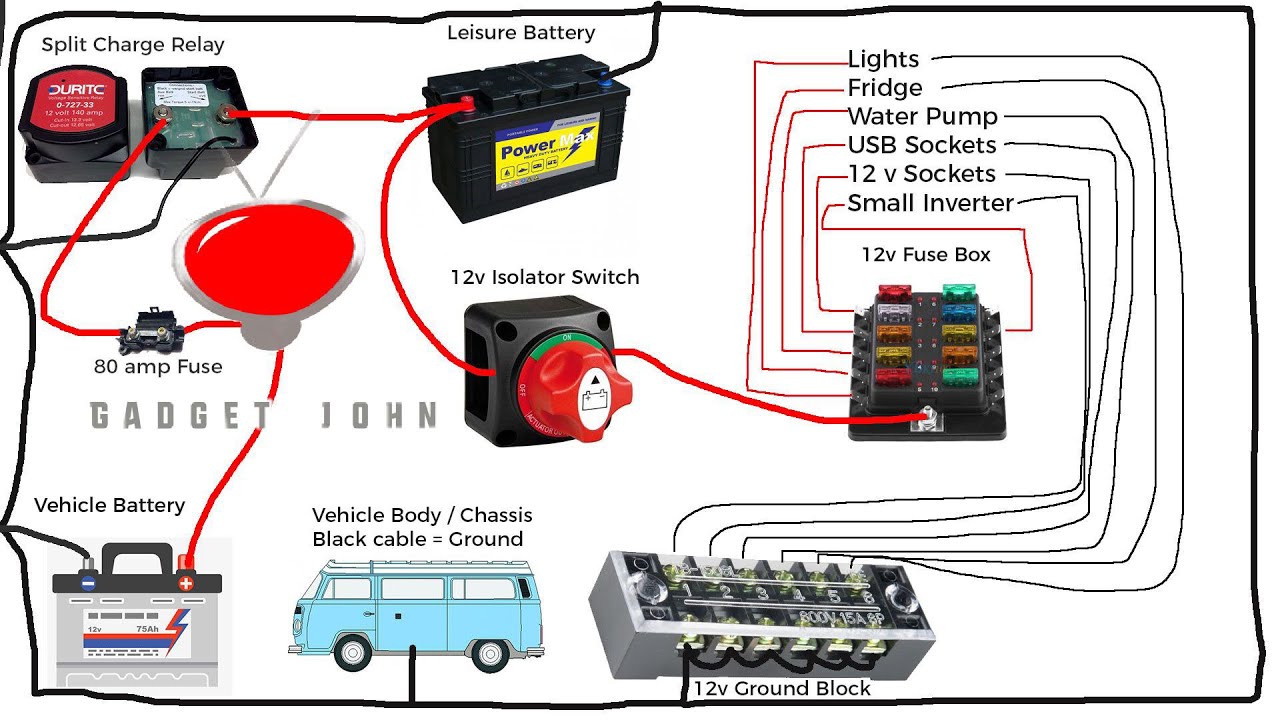
Connecting the Battery Switch
The process involves connecting the battery switch to the battery, the trailer’s electrical system, and ensuring a proper ground connection. This ensures that power flows correctly and safely through the system.
- Connect the Positive Lead: The positive (+) lead from the battery should be connected to the input terminal of the battery switch. This terminal is usually clearly marked.
- Connect the Output Lead: The output terminal of the battery switch is then connected to the positive (+) lead of the trailer’s electrical system. This carries power to all 12V components.
- Grounding: A separate, heavy-gauge ground wire should run directly from the negative (-) terminal of the battery to the trailer’s chassis. This provides a secure path for the return current, preventing voltage drops and ensuring proper operation of the system. Never rely on the battery switch for grounding.
Importance of Proper Grounding
A secure ground connection is paramount for the safe and efficient operation of your travel trailer’s electrical system. A poor ground can lead to erratic behavior of electrical appliances, corrosion on components, and even fire hazards.
The ground wire provides a low-resistance path for the return current. Without a proper ground, current may seek alternative paths, potentially damaging components or causing electrical shorts. A heavy-gauge wire is recommended to minimize voltage drops and ensure sufficient current capacity.
Mastering your travel trailer’s battery switch is a simple yet powerful step toward ensuring reliable power on your adventures. By understanding its function, troubleshooting common problems, and performing regular maintenance, you can avoid frustrating electrical issues and keep your appliances running smoothly. Remember to consult your owner’s manual for specific instructions regarding your model, and don’t hesitate to seek professional help if you’re unsure about any aspect of the process.
Happy travels!
Q&A: Battery Switch On Travel Trailer Function
What happens if my battery switch is left in the “off” position?
Leaving the switch off completely disconnects your house batteries from the rest of the trailer’s electrical system. This prevents battery drain, but also means you won’t have power to your appliances unless you’re plugged into shore power.
How often should I inspect my battery switch?
Inspect your battery switch at least once a year, or more frequently if you notice any unusual behavior. Look for corrosion, loose connections, or damage to the switch itself.
Can I use a different type of battery switch than what came with my trailer?
While you
-can* replace your battery switch, it’s important to choose a replacement with the correct amperage rating and wiring configuration to avoid damage to your system. Consult a qualified electrician if you’re unsure.
My battery switch is making clicking noises. What’s wrong?
Clicking noises often indicate a loose connection or a problem with the switch itself. Check for corrosion and tighten any loose connections. If the problem persists, the switch may need to be replaced.
